How to verify your AC Compressor has failed before removing it
May 12, 2017The time to diagnose a compressor is while it is on the vehicle and a failure can be determined by using a few simple steps. In many instances, compressors are removed due to low refrigerant or a blown fuse.
Step 1— Is compressor rotation smooth?
With vehicle off, turn the compressor shaft with a 14mm socket to check for smooth rotation. Grinding or hanging during shaft rotation is caused by broken components within the compressor.
If the answer is yes, continue with steps 2 – 4.
If the answer is no, replace the compressor.
Step 2 — Is field coil receiving greater than 11.5 volts?
This test should be conducted with the engine running and clutch engaged.
If the answer is yes, continue with steps 3 – 4.
If the answer is no, check and correct vehicle electrical system.
Step 3 — Is field coil resistance between 2.8 and 4.4 ohms?
The coil resistance outside of this range will not engage or will cause fused circuits to open.
If the answer is yes, continue with step 4.
If the answer is no, replace the compressor.
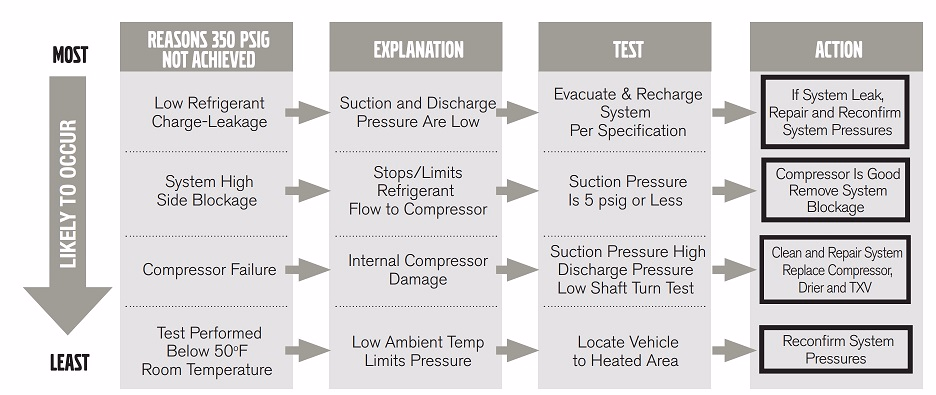
Step 4 — Is the compressor capable of producing 350 psig or more?
Excessive high pressures can be artificially produced by preventing air flow across the condenser, thus minimizing heat removal from the system. This can be best accomplished by disconnecting the fan switch / relay, or simply blocking the condenser with a sheet of cardboard.
If the answer is yes, the compressor is functioning properly.
If the answer is no, use the flow chart below.
If you need to replace your AC Compressor, Class8TruckParts.com has a great selection of AC Compressors available to purchase online here