Tech Tip: Diagnosing Starting Systems Equipped with Smart IMS
August 17, 2018Our latest tech tip focuses on the diagnostic procedure of a starting system equipped with a Smart IMS starter. It’s important to note that some of the Smart IMS features could be misdiagnosed as a starting problem. These features help protect the starting system.
The procedure for a Smart IMS-equipped starter is similar to that of any standard starter.
Step 1: Determine the symptom of the complaint, which may include a click/no crank condition, a no click/no crank condition or a slow cranking condition.
Step 2: Assess the state of charge and condition of the vehicle batteries. If it is less than 65%, then the batteries must be charged. You should not continue testing with a discharged or failed battery as it can lead to misdiagnosis.
Step 3: Perform a starter voltage drop test on the main starting cables. The voltage drop on a 12-volt heavy duty system should be no more than .5 volts at 500 amps. If the main cable voltage drop is excessive, then review the test results to determine if the positive or negative cable is the cause and make the needed repairs. Be sure to complete any needed repairs to the main cable before continuing testing.
Step 4: Test the starter control circuit.
- If the symptom is slow cranking, the control circuit is working properly since the starter is cranking.
- If the battery and main cable test are within specifications and the symptom is a slow crank condition, then the starter is the cause and should be replaced.
- If the symptom is a click/no crank or a no click/no crank, then a voltage drop test should be performed on the starter control circuit. There must be at least 8 volts at the Smart IMS “S” terminal with the key in the start position.
- If the voltage is less than 8 volts, make the necessary repairs. If the voltage is above 8 volts and the batteries and main cables have been tested, then the starter is the cause and should be replaced.
Step 5: If the diagnosis requires a starter replacement, inspect the ring gear for damage first. If there’s damage, be sure to replace it because installing a new starter on a vehicle with a damaged ring gear will create repeat starter failure.
Certain Smart IMS Features May Prevent Cranking
When diagnosing either a click/no crank or no click/no crank condition, keep in mind the Smart IMS features that could also prevent cranking—these are normal and should not be confused with genuine starting problems.
These features include:
- Limiting cranking time to 20 seconds with a 10-second delay before re-engagement, reducing damage caused by excessive cranking.
- A three-second delay after each start attempt to assure the engine and starter have come to a complete stop, protecting the pinion and ring gear from milling damage.
- Preventing starter engagement if battery open circuit voltage is below 11.75 volts on a 12-volt system, preventing solenoid disk chatter and terminal overheating.
- Preventing starter engagement if the battery voltage is 13.75 volts or greater, protecting the starter from engagement into a running engine.
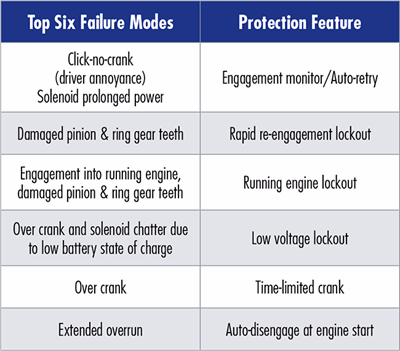
What is IMS? IMS stands for Integral Magnetic Switch which is integrated into starters and offers protection against six common failure modes that can arise from system issues. In each instance of failure, a protection feature has been specifically designed to counteract the failure and keep it from happening. This technology, as it has many advantages, is being implemented by more and more commercial fleets.
To install the Smart IMS, you must first disconnect the batteries from the vehicle. You must then remove the starter from the engine. Do this via the manufacturer's instructions. Once this is complete, you'll need to do the following:
- Remove the IMS leads from the motor terminals
- Remove the IMS from the motor, remembering to keep the fasteners to reuse them
- Remove solenoid motor terminal nut
- Clean connections
Now it is time to install the Smart IMS. You will want to follow these steps*:
- Mount the ground lead, if required, between the IMS mounting and solenoid ground terminal.
- Mount new Smart IMS onto the motor
- Attach Smart IMS motor terminal lead to the solenoid motor terminal
- Attach the Smart IMS battery terminal lead to solenoid battery terminal and keep finger-tight until mounting on the engine.
- Attach the Smart IMS switch terminal lead to solenoid switch terminal.
- Secure all leads to the solenoid with a zip tie and assure all fasteners are properly torqued.
- Reinstall the starter via the manufacturer's instructions and reconnect the batteries.
*Courtesy of Delco Remy
In addition to counteracting the six most common failure modes, the Smart IMS prevents cost repairs, replacement costs and/or denied warranty claims that frequently result from these failures.